

How To Register A Autocomplete View
Hello and welcome to another tutorial from Codingdemos, today you will learn how to use Android AutoCompleteTextview. This AutoCompleteTextview view allows you to shows a dropdown list of text as y'all type inside this EditText. Allow'southward open Android Studio and build the app 🙂
By the end of this tutorial, you will have an app that looks like this. (Large preview)
In this tutorial nosotros volition be using the post-obit:
Android Studio version 4.i.2
Minimum SDK API 23
1- Open up Android Studio.
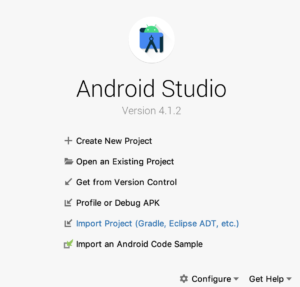
Android studio four.i.two welcome screen. (Large preview)
two- Adjacent, open up activity_main.xml file, and add the Android autocompletetextview.
< AutoCompleteTextView android:id="@+id/autoCompleteTextView" android:layout_width="match_parent" android:layout_height="wrap_content" app:layout_constraintEnd_toEndOf="parent" app:layout_constraintStart_toStartOf="parent" app:layout_constraintTop_toTopOf="parent" /> iii- Now open strings.xml file, and add the array that will populate the Android autocompletetextview dropdown.
< string-assortment proper noun="sweets"> < detail>Chocolate cake< /item> < item>Vanilla cake< /detail> < item>Strawberry cake< /particular> < item>Cheese cake< /item> iv- Open MainActivity.java file, declare and initialize the android autocompletetextview and it's information. First will declare and initialize android autocomplete edittext.
AutoCompleteTextView autoCompleteTextView = autoCompleteTextView = findViewById(R.id.autoCompleteTextView); 5- You declare and initialize the adapter used to hold the android autocompletetextview dropdown information.
ArrayAdapter arrayAdapter = new ArrayAdapter(MainActivity.this, android.R.layout.simple_list_item_1, getResources().getStringArray(R.array.sweets)); 6- Finally, you lot will need to connect the autocompletetextview with the arrayadapter so that the data will appear in the autocompletetextview dropdown.
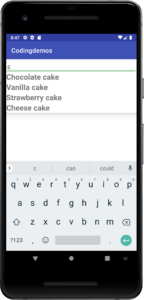
autoCompleteTextView.setAdapter(arrayAdapter); 7- Build and run the app to see the output.
Android autofill example showing list of deserts. (Large preview)
Customizing Android autoCompleteTextview
In this department, yous will larn few things on how to customize the style of the autocomplete dropdown.
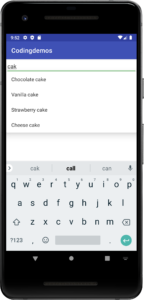
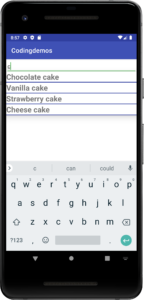
viii- Currently, you lot need to key in multiple characters in club to see the autocompletetextview dropdown. Let'due south customize that and then that you can see the dropdown event appears after central in a unmarried character. Add the following lawmaking inside autocompletetextview.
android:completionThreshold="1" 9- Build and run the app to see how it looks.
Android autocompletetextview dropdown appears with a single character input. (Large preview)
x- You tin prepare a hint for AutoCompleteTextView which will appears in the autocomplete text dropdown. You can add the post-obit code inside AutoCompleteTextView.
android:completionHint="Choose a block" xi- Let's build and run the app to see the event.
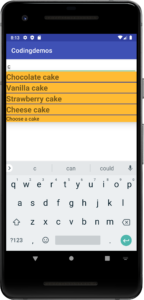
Added a hint to autocompletetextview dropdown. (Large preview)
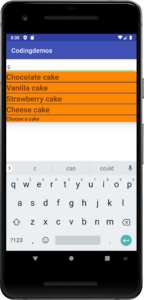
12- You tin can change the groundwork color of the dropdown listing besides. Let's do information technology by adding the post-obit code inside AutoCompleteTextView.
android:popupBackground="@android:color/holo_orange_light" 13- Build and run the app to come across the background color.
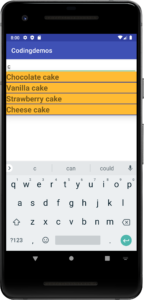
Changed the background color of the autocompletetextview dropdown. (Big preview)
Create an Android autocompletetextview custom adapter
In this department, you will larn how to create a custom adapter. This will allow you lot to customize the autocompletetextview dropdown style'southward appearance in terms of text size and color.
14- Create an XML layout file, and proper name it layout_item_autocomplete.
< ?xml version="1.0" encoding="utf-8"?> < LinearLayout xmlns:android="http://schemas.android.com/apk/res/android" android:layout_width="match_parent" android:layout_height="wrap_content" android:orientation="vertical"> < /LinearLayout> 15- Next y'all need to add together an Android TextView. This Textview volition be used to testify the title of the detail in the dropdown list.
< TextView android:id="@+id/tvCustom" android:layout_width="match_parent" android:layout_height="wrap_content" /> 16- At present open again the MainActivity.java file, hither you need to brand a slight modify in the adapter so that y'all can use layout_item_autocomplete as the layout instead of android.R.layout.simple_list_item_1.
ArrayAdapter arrayAdapter = new ArrayAdapter(MainActivity.this, R.layout.layout_item_autocomplete, getResources().getStringArray(R.array.sweets)); 17- Build and run the app to see the new layout.
Android autocomplete custom adapter crash while trying to key in a grapheme. (Large preview)
18- The reason the app crashed in stride thirteen was that in the custom layout, y'all have an Android TextView, but you lot didn't include the view's ID inside the adapter. Hither is the crash log from Android Studio's Logcat.
java.lang.IllegalStateException: ArrayAdapter requires the resource ID to be a TextView nineteen- You can ready that crash by adding the TextView inside the adapter.
ArrayAdapter arrayAdapter = new ArrayAdapter(MainActivity.this, R.layout.layout_item_autocomplete, R.id.tvCustom, getResources().getStringArray(R.array.sweets)); 20- Now build and rerun the app.
Android autocompletetextview custom adapter. (Large preview)
21- Let's increase the text size and then that it looks bigger and gear up the text style to be bold. Add the post-obit code inside layout_item_autocomplete.xml file.
android:textSize="24sp" android:textStyle="bold" 22- Build and run the app to encounter the output.
Custom autocompletetextview adapter in Android. (Large preview)
23- Did you notice that the text inside the autocomplete dropdown appears to exist close to each other? Let's fix that past adding a separator line view within layout_item_autocomplete.xml file.
< View android:layout_width="match_parent" android:layout_height="2dp" android:background="@color/colorPrimaryDark" /> 24- At present build and run the app.
Custom autocompletetextview adapter with line separator. (Large preview)
25- Here is the total code for activity_main.xml file.
< ?xml version="1.0" encoding="utf-8"?> < androidx.constraintlayout.widget.ConstraintLayout xmlns:android="http://schemas.android.com/apk/res/android" xmlns:app="http://schemas.android.com/apk/res-motorcar" xmlns:tools="http://schemas.android.com/tools" android:layout_width="match_parent" android:layout_height="match_parent" tools:context=".MainActivity"> < AutoCompleteTextView android:id="@+id/autoCompleteTextView" android:layout_width="match_parent" android:layout_height="wrap_content" android:completionHint="Choose a cake" android:completionThreshold="1" android:popupBackground="@android:colour/holo_orange_light" app:layout_constraintEnd_toEndOf="parent" app:layout_constraintStart_toStartOf="parent" app:layout_constraintTop_toTopOf="parent" /> < /androidx.constraintlayout.widget.ConstraintLayout> 26- Here is the full code for MainActivity.coffee file.
package com.codingdemos.codingdemos; import android.bone.Bundle; import android.widget.ArrayAdapter; import android.widget.AutoCompleteTextView; import androidx.appcompat.app.AppCompatActivity; public class MainActivity extends AppCompatActivity { AutoCompleteTextView autoCompleteTextView; @Override protected void onCreate(Parcel savedInstanceState) { super.onCreate(savedInstanceState); setContentView(R.layout.activity_main); autoCompleteTextView = findViewById(R.id.autoCompleteTextView); ArrayAdapter arrayAdapter = new ArrayAdapter(MainActivity.this, R.layout.layout_item_autocomplete, R.id.tvCustom, getResources().getStringArray(R.assortment.sweets)); autoCompleteTextView.setAdapter(arrayAdapter); } } 27- I hope you find this tutorial helpful, and if you have whatsoever questions, please post them in the comment beneath.

How To Register A Autocomplete View,
Source: https://www.codingdemos.com/android-autocompletetextview-with-custom-layout/
Posted by: linseycathad.blogspot.com
0 Response to "How To Register A Autocomplete View"
Post a Comment